How to Connect AirPods to PC
In today’s world, AirPods have become a symbol of convenience and quality when it comes to wireless audio. These small, sleek earbuds are not only popular among iPhone users but also work well with various other devices, including Windows PCs. If you’re wondering how to connect your AirPods to a PC, you’re in the right place. This guide will walk you through the process step-by-step, ensuring you can enjoy your AirPods on your computer without any hassle.
AirPods Compatibility with PCs
AirPods are primarily designed for use with Apple devices, but that doesn’t mean you can’t use them with your Windows PC. They use Bluetooth technology, which is a standard wireless communication protocol that most modern devices, including PCs, support. The process of connecting AirPods to a PC might be slightly different from pairing them with an iPhone, but it’s relatively straightforward.
Preparing Your PC for Pairing
Before we discuss the actual process of connecting your AirPods to your PC, let’s make sure your computer is ready:
- Check for Bluetooth Support :
- Ensure your PC has Bluetooth capability. Most modern laptops come with Bluetooth built-in, but if you’re using a desktop, you might need a Bluetooth adapter.
- To check if your PC has Bluetooth, press “Windows + X” and select “Device Manager”. Look for “Bluetooth” in the list.
- Update Bluetooth Drivers :
- Outdated drivers can cause connectivity issues. To update, go to “Device Manager”, expand the “Bluetooth” section, right-click on your Bluetooth adapter, and choose “Update driver”.
- Charge your AirPods :
- Charge your AirPods sufficiently before you begin the pairing process. This ensures they have enough power to complete the connection.
Steps to Connect Airpods to PC
Now that your PC is ready, follow these steps to connect your AirPods:
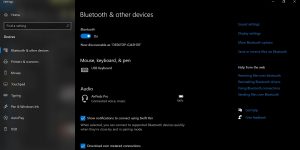
1. Open Bluetooth Settings on Your PC
- Windows 10:
- Click on the “Start” menu and select “Settings”.
- Choose “Devices”, and then click on “Bluetooth & other devices”.
- Make sure the Bluetooth toggle is switched on.
- Windows 11:
- Click on the “Start” menu and select “Settings”.
- Go to “Bluetooth & devices”.
- Toggle Bluetooth on if it’s not already.
2. Ensure Your AirPods in Pairing Mode
- Open the AirPods case, leaving the AirPods inside.
- Press the button on the back case until the light flashes white. As a result, the Airpods symbolize the Airpods are in pairing mode.
3. Pair Your AirPods with the PC
- Go to the Bluetooth settings on your pc then, click on “Add Bluetooth or other device”.
- Select “Bluetooth” from the list of options.
- Your PC will search for nearby Bluetooth devices. When AirPods appear in the list, click on them.
- The connection process will start, and after a few seconds, you should see a confirmation that your AirPods are connected.

Troubleshooting Common Issues
Even with the best of efforts, sometimes things don’t go as smoothly as planned. Here are some significant issues and how to resolve them:
- AirPods Not Appearing in the Bluetooth List
- Solution: Ensure that your AirPods are in pairing mode (the LED should be flashing white). If they still don’t appear, try restarting your PC’s Bluetooth service. You can do this by typing “Services” in the Windows search bar, finding “Bluetooth Support Service”, and restarting it.
- Connection Drops Frequently :
- Solution: This can happen if your PC’s Bluetooth drivers are outdated or if there’s interference. Make sure your drivers are up to date, and try to reduce interference from other devices or Wi-Fi networks. You might also want to keep your AirPods and PC closer together to maintain a strong connection.
- Audio Quality Issues :
- Solution: Poor audio quality could be due to a weak Bluetooth connection or your PC using a lower-quality audio profile. Ensure that your PC is using the correct audio output device (AirPods) and that it’s set to use the best audio profile available. This can be adjusted in the sound settings of your PC.
Customizing Your AirPods Experience on PC
Once you’ve successfully connected your AirPods to your PC, you might want to customize the experience. Here are some tips on how to do that:
- Ensure The AirPods as the Default on the Device
Go to “Control Panel > Sound”, and in the “Playback” tab, find your AirPods. Right-click and select “Set as Default Device”. This ensures all audio is routed through your AirPods.
- Control Audio Playback
You can control audio playback (pause, play, skip) directly from your AirPods by double-tapping them if you’re using AirPods Gen 1 or 2, or by squeezing the stem if you’re using AirPods Pro.
- Adjust Volume :
You can adjust the volume either from your PC or using the touch controls on your AirPods. This can help you
- Use AirPods for Calls :
If you’re using your AirPods for video calls, ensure that they’re selected as both the input and output device in the settings of the communication software you’re using (like Zoom or Skype).
Advanced Tips and Tricks
For those who like to explore a bit more, here are some advanced tips:
- Using AirPods with Multiple Devices :
AirPods can remember multiple devices but will connect to the last paired device automatically. To switch between devices, you need to disconnect them from the current device and then connect them to the new one through the Bluetooth settings.
- Maximizing Battery Life :
To maximize your AirPods’ battery life when using them with a PC, consider turning off features like automatic ear detection if you don’t need them. This can be done on an iPhone or iPad, which will then carry over to when using them on a PC.
- Updating AirPods Firmware
AirPods firmware updates are done automatically when they’re connected to an Apple device. However, if you only use them with a PC, occasionally connecting them to an iPhone or iPad to check for updates is a good practice to ensure they’re running the latest software.
Tips for Extended Issues :
If you encounter persistent issues, try these additional troubleshooting tips:
- Reboot Your PC :
Sometimes, Reboot can resolve connectivity issues. First Restart your PC and try connecting your AirPods again.
- Reset AirPods :
If your AirPods are not connecting properly, try resetting them. To reset AirPods, place them in the charging case, open the lid, and hold the setup button on the back until the LED flashes amber, then white. This will erase all previous connections and allow you to start fresh.
- Check for Interference :
Different wireless devices and physical obstacles affect Bluetooth connections. Ensure there are no major sources of interference nearby, and keep your AirPods and PC within a reasonable distance from each other.
- Use Bluetooth Troubleshooter :
Windows includes a built-in Bluetooth troubleshooter that can help identify and fix issues. To access it, go to “Settings > Update & Security > Troubleshoot > Additional troubleshooters”, and select “Bluetooth”.
- Ensure Compatibility :
Make sure that the Bluetooth version of your PC is compatible with the Bluetooth version used by your AirPods. While most modern PCs should work fine, compatibility issues can sometimes arise.
Conclusion
Connecting your AirPods to a PC might seem a bit daunting at first, especially if you’re more accustomed to the Apple ecosystem. However, as this guide shows, the process is quite simple and straightforward. Whether you’re using them for work, gaming, or just listening to your favorite music, AirPods can be a great addition to your PC setup. Just follow the steps outlined above, and you’ll be enjoying the seamless wireless experience that AirPods offer in no time.

Remember, if you run into any issues, don’t hesitate to revisit the troubleshooting section. With a bit of patience and the right approach, you’ll be able to overcome any challenges and get the most out of your AirPods on your PC. Happy listening!
Thank you for reading………..For More


